We thought we’d use this, our very first blog post to go over a topic that comes up on a daily basis – what is a bleed and how to I set my file up correctly for bleeds?
You know those printed pieces where the image or the background color goes all the way to the edge of the sheet? It looks like they are printed that way – but the reality is that our machines can’t print to the very edge of a sheet. We print your file on a sheet that is larger than what it will be when it is finished, and that extra is trimmed off before your order is packaged. That extra that is trimmed is called BLEED. Without it, your printed materials would have a white margin all the way around – even if that isn’t what was intended in your design.
Sometimes we can take a file that isn’t set up properly and make it work, by either trimming it down a bit smaller than the desired size, or by enlarging the file a bit and then trimming off the excess – but its a much smoother process and you’ll get a better result if you set up your file properly before it comes to us for production.
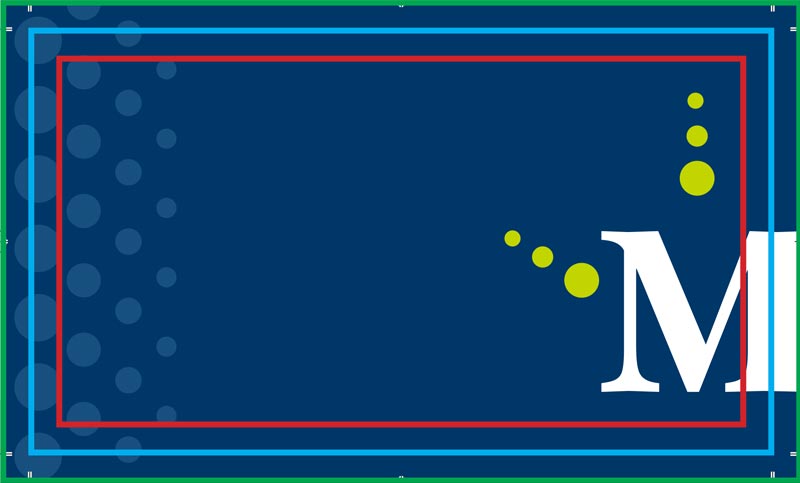
We’ll use a our business card as an example, a standard U.S. size – it will have a finished (trimmed) size of 3.5” wide and 2” tall.

Because the printed image will run all the way off the edge of the sheet on all four sides, we’ll want to add a .125” bleed to the file. I’ll tell you how to do that more specifically in some popular applications in the next post, but for now we’ll look at the artwork itself. As we are adding .125” on all four sides, our final document will now need to be 3.75” x 2.25”. But how will the staff at Morrell Printing Solutions know that I want my final cards trimmed to 3.5” x 2”? We’ll also include TRIM MARKS that will show exactly where the piece will be trimmed.

Now our piece will look fantastic when it is finished,, and the folks in our bindery department will know exactly where this piece should be trimmed. That’s it, right? No – there’s one other thing we need to be aware of – that is the LIVE IMAGE AREA.
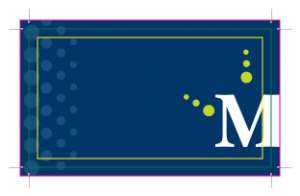
In the example above there are three boxes shown – 1) the magenta box is our BLEED box and shows the extra .125” we added to the file, 2) the green box is our TRIM BOX – where the cards will actually cut and 3) is our LIVE IMAGE AREA box. The live image area is the safe area for text and/or graphics we absolutely do not want to get cut off. Any names, phone numbers, titles, etc. should be place .125” away from the trim line to be sure that they do not get cut off.
That’s it! In the next post we’ll show you how to set up your bleeds and marks in the most popular layout programs.